Welcome to the new blog!

Well, here it is.  My new home.  Hmmm, feels different, fresh, ready for adventure.  Well, some things will take a little getting used to.  Have to find a new place to put this or that.  The old stuff in the new place feels kinda nice.  I’ll be getting organized.  Checking old links, cleaning up old posts, and adding new goodies while settling in.

Thanks for stopping by.  I do hope to see you again soon!

P.S…Don’t forget to subscribe to the new feed! 

Posted in Uncategorized | Leave a comment

Transition. Flux. Shift. Reconstruction. Change.

I’m in a state of metamorphosis, flux, change.  I’m completely ensconced in my cocoon and I don’t want to come out of it yet.

We’ve moved across the country, uprooting our lives completely.  We are without a local support network.  No friends or church yet.  Life has been uncertain as far as where we’d be living.  The choices range from the city, suburb, or small town.  We’re living in the small town, an hour’s drive from the city.  Its really what I know and love, but we’ve been hesitant for the last 6 months to build a life and set down roots since we didn’t know exactly where we’d end up.    But, we’re making progress.  We’ve finally decided to stay in the small town and build a house. 

The second change is college.  My DD will begin in the fall.  Its a scary prospect for both of us.  Me, having to cut some apron strings, and her moving on to something new.  There’s a lot to do between now and then. 

Thirdly, and the one change weighing on me the most, is Google.  I’ve been contemplating moving this blog elsewhere since I’ve used up all my free photo allowance space and can’t figure out how to clear the old to make room for the new. (And I’m too cheap to pay for more storage.) Then, Google’s decision to force social networking on me sealed the deal.  The CEO of Google has decreed that anyone using their platforms is required to have a Google+ account.  Essentially, a Facebook style social network that automatically posts all your activity across Google for the world to see.  As of now, I cannot upload, comment, or add to my playlists on YouTube without Google+.  I can still log in to Blogger without the forced sign up, but I suspect that will soon change too.  I’m thinking WordPress is the way to go.  But, as with any endeavor, it will be a learning curve.  I’ll have to learn how the format works and get everything moved over.  I’ll need to archive my YouTube favorites and subscriptions elsewhere so I can find them again, and find a new feed for the blogs I follow.  Then, weeding Google completely out of my computer….especially Picasa will take a bit of effort. 

So, please be patient with me!  I don’t suspect I’ll be posting much, or exporting anything until the house is finished…which should be late summer.  I can’t wait.  This cocoon might just have the first inklings of feeling a little claustrophobic.

Posted in Uncategorized | 1 Comment

Lolita Headwear Workshop Materials List

Konnichiwa fellow Lolitas!

This post is a materials and sourcing list for a workshop I’ll be teaching for the Frozen Lolita Club in the near future. We’ll be making bonnets, Lolita head dresses, and bows. I’ll turn it into an online tutorial after the workshop.

Choose a good quality cotton fabric for the areas needing fabric. Stay away from broadcloth or anything you can almost see through. Kona cotton, Country Classics, calico, quilting weight fabrics, etc. are all good. Lace should feel soft to the skin. Avoid lace that feels crunchy or rough.  Don’t worry about getting the “wrong” things.  We’ll make do with whatever comes along and you’ll improve your sourcing and crafting skills with practice.  The main goal is to have fun!

FOR ALL PROJECTS…
You’ll need a needle and thread OR a hot glue gun and glue sticks AND sharp scissors.

Headdress… Here is a good article on rectangle headdresses for beginners. 
1.  Estimate the length (from ear to ear) you want your headdress to be.  Then decide how wide you would like it.  You’ll need a piece of fabric with those measurements plus 1 inch.  For example, I want mine to measure 7″ long and 3″ wide.  I’ll cut a piece of fabric 8″ long and 4″ wide.  The extra fabric will be turned under and stitched.  
2.  How will you attach it? 
*If it will tie under your chin, you’ll need ribbon.  Measure from the top of your ear to under your chin, and quadruple that measurement.  For example: My measurement is 9 inches, so I will need 36 inches of ribbon. 
*If you’ll use elastic, measure from the top of your ear to under your chin and double the measurement.  Then add 2″.  For example: My measurement is 9″, so I will need 18″ of elastic plus 2 inches to equal 20 inches total.
*If you’ll use clips, pick up 2 flat metal hair clips, or 2 combs to sew onto the headdress.
3.  Decide what kind of embellishments you’d like.  Look at examples online.  You’ll likely want lace, and will need at least 3 feet (1 yard) of lace.  You may also want ribbon, so count on about 1 yard of that too.  Don’t forget to pick up silk flowers, charms, bows, etc. if you’d like to add them.

Bonnet…Here’s an example of what we’ll be making. 
1.  You’ll need a straw hat with a wide brim.  It should be in fair to excellent condition.  A little wear and tear is okay, especially if you’re planning to cover the whole thing with fabric.  The best place to find these is thrift stores and garage sales.  Don’t be afraid to pick one up with hideous trims/flowers…they can always be ripped off the hat.  Try to avoid hats with a very loose weave, unless you’ll cover them completely with fabric.
2.  Fabric…this is where you need to decide where you want fabric.  You could use only the brim and add a fabric pouf on the back, or you could use fabric on both the inside and outside of the hat.  Here’s an example of a hat I covered completely and made the pouf.  Even though this one sits on top of my head instead of Lolita bonnet style, the concept is the same.  I’m estimating you’ll need 1/2 a yard of fabric to cover the inside of the brim, 1/2 to 1 yard of fabric to completely cover the outside, and about 1/2 a yard of fabric if you want to make a pouf.  These are generous estimates, so if you’re a little shy of that, it should be fine. 
3.  Ties…you’ll need about 1 yard of ribbon or 1/4 yard of fabric.
4.  Embellishments…lace, flowers, toys, bows, etc.  Here are some examples of gorgeous bonnets.

BowsHere’s my tutorial on making bows.  We’ll make some at the workshop if anyone is interested.  Adding bows to the headdresses and/or bonnets is easy to do. 
1.  You’ll need a rectangle of fabric that is twice as long and twice as wide as the bow you want to make.  You’ll also need another rectangle about 1/4 of the size of the larger one.
2.  If you want to make an Alice bow, you’ll need 2 large rectangles.  The first large rectangle will be 1″ to 1 1/2″ larger than the second rectangle.  Then, you’ll need one smaller rectangle that is 1/4 the size of one of the large rectangles.
3.  Lace or other trims to embellish the bow. 

SOURCING

Fabric stores are an obvious choice.  You can sign up for coupons for JoAnn Fabrics online.  They’ll come to your email and you print them off to use them.  JoAnn Fabrics also accepts Michael’s coupons.  Look in the fabric remnants bin to find precut pieces in various lengths for 50% off the original price.  You’ll also find silk flowers and charms there. 

Craft stores like Michaels are a great source for silk flowers and charms too.

Thrift stores and garage sales are a gold mine of great fabric and lace.  Look for velvet, silk, brocade, leather, wool, and cashmere clothing.  You can sometimes pick up wedding gowns, with excellent quality satin, and dye the fabric.  You can also salvage lace appliques & trim, and beads off wedding dresses.   Check the children’s clothing section for Lolita-esque fabric prints that could be used for appliques and bows.  Also look for dust ruffles.  There is A LOT of hemmed fabric on dust ruffles.  They’re especially great if you can find eyelet lace ruffles.  Steer clear of dust ruffles with serged hems and/or crunchy, rough, or see through cotton fabrics.  Look for straw hats, purses that could be embellished, and new shoes.  Ugly bed sheets make great mock up fabric if you’re sewing a new pattern, or plain sheets are good for lining bodices and making petticoats & bloomers.  Even pajama pants could be cut down and turned into cute, and warm, bloomers.

If you have questions, email me at ladymccormick (at) yahoo.com

Posted in Uncategorized | 1 Comment

Steampunk Fairy Costume


I’ve been following this site for several years now. This young lady is an amazing costumer and I’m in love with her Steampunk Fairy costume. Check it out!

Posted in 2012, Costumes, Steampunk | 1 Comment

Stocking Cap

I found this easy pattern for a fleece stocking cap. (Like an old fashioned sleeping cap.) Mine came out wonderfully and I highly recommend it.

Posted in 2010, Sewing | Leave a comment

Lolita/50’s Inspired Mashup

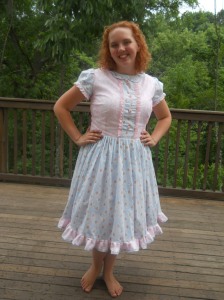
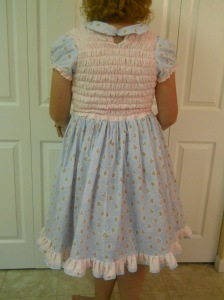
(As always, click the pics to make them larger.)Today’s offering is a Lolita/50’s era inspired mashup dress. I say Lolita because It has all the basic lines, but is a little longer than normal aka 50’s era. (It really looks fifties when she wears her super poof petticoat and high heels, which she was neglecting in the pics.)

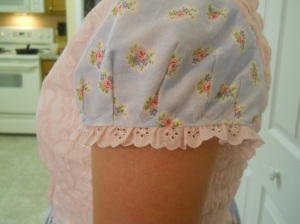
I had the blue fabric floating around and never could find something to compliment it. Miss H was in love with it and one day suggested I use the leftover pink lace from her Irish dance dress with it. This is a Cynthia Rowley pattern #1873 from Simplicity.This was view A. I drafted a peter pan collar for it and shirred the back, instead of adding the zipper.I don’t think I’m completely in love with the shirring on this one. She likes it because it’s comfy. Anyway, the pattern was easy to follow, but beware of the ten thousand darts! The bodice front has under bust darts as well as side darts. The sleeve is full of darts too, on both the fashion fabric AND the lining fabric.I was cussin’ em under my breath while in progress. They’ve grown on me and I really like the result now. It wouldn’t take much cajoling to get me to use this sleeve again. (It’s kinda like labor…you forget all the work involved as time goes on!)The bodice panel is edged in pink eyelet lace with daisy buttons.There was just enough blue fabric left to make the trim for the hem ruffle.This dress was super economical. White sheet from the thrift store for the lining and white fashion areas = $1. Pink overlay lace, leftover from another project = Free! 4 Daisy buttons, been in my stash for 10 years = Free! Pink eyelet lace, came from a garage sale with just enough for the sleeves and panel = $0.25. 2 yards blue fabric, been in my stash for more than 3 years = Free! (I know I bought it new, but am sure I didn’t pay more than $3/yard.) Interfacing for the collar, leftover scraps = Free! Yay, a nearly free dress AND another finished project out of my basket!

Posted in 2012, Lolita, Sewing | 1 Comment

We’re off to see the Wizard….The Wonderful Wizard of OZ!

Ha! Caught ya with my title, right?!? Here’s the scoop. We’re not reeeally going to Oz to see the wizard(unless you count the magical lights in the sky). We’re moving. Where? Somewhere magical, of course. Isn’t anywhere more magical than where you are?

Why, you ask. Oh, lots of reasons. The biggest would be my husband’s job…or lack of one. He was laid off and we are now jobless. So we thought…why live where we don’t want to be without a job when we could live where we DO want to be without a job? Logical, eh?

Are you CRAZY? Yes, well, we’ve known for about two years that we weren’t happy in our current state. It’s on the opposite side of the country from our friends and family. We’ve known for about 9 months that he was going to be laid off. 9 months. Ironic isn’t it? It really feels like we’ve been in labor for the last month.

How? Movers, of course. We’ve been saving up, scrimping everywhere since we learned of the coming lay off. We’ve sold off and pared down our belongings by 75%. Yes, I said 75%! It was quite a feat with 4 pack rats and 20+ years of stuff. But leaving this place was more important to us and our long term goals than keeping excess stuff. It’s amazing what you can live without and don’t even miss.

When? VERY soon. WAHOO! Oops, sorry. Just get a little excited at the prospect. We’ve sold our house. Another big hurdle in this economy and we took a 28% loss, but we’ve planned ahead and we’ll be okay.

Why are you sharing this? Because I want you to be encouraged. You can make your dreams come true and live the life you want. You only get one chance at it. When the news is nothing but doom and gloom, there is always a beacon of hope out there. We rely on our faith in God to bring us through. We plan ahead. We spend wisely. You can do it too.

We’re about to be homeless, jobless, and untethered…at least for a little while. It looks like an adventure waiting to happen!

Posted in 2012, Inspiration | 2 Comments

Borrower’s House

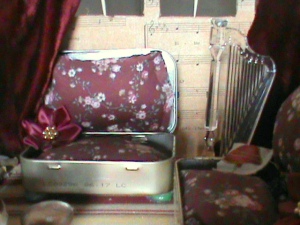
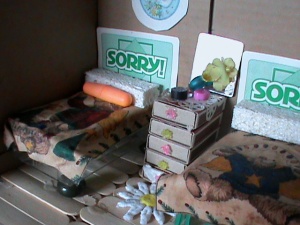
I managed to snap some pics of my daughter’s Borrower’s house. She and I crafted this glorious borrowed mansion 9 years ago for a school project after reading the book. It was a lot of fun. This one is decorated for Christmas, and we displayed it seasonally for several years. Sadly it was damaged during our last move, and with another move imminent it was relinquished to the trash bin. The bitty abode had three floors. The parlor on the main floor, kitchen on the second floor, and bedroom & bathroom sharing the third floor. (Click a picture to make them larger.)
The parlor is furnished with Altoid tin sofas, a rock fireplace, and velvet curtains.

The spacious kitchen is wallpapered with a delectable menu and sports a band aid tin stove, checkerboard floor, and sand dollar table.


The quaint bathroom has a large shell bathtub and daisy rug. Unfortunately, this room took the most damage and lost it’s other fixtures.And finally, the cute bedroom boasts two comfy kitchen sponge mattress beds, a matches chest of drawers, and a real plastic mirror.
And the tour is complete. Isn’t imagining fun!

Posted in 2012, Decorating | 1 Comment

Just Shoot Me Now!

This is a confession.

I’m sure I’m not alone in committing such a sewing faux pas. Just thought you’d get a chuckle out of my folly whilst I put “pen to paper” to document this so as to remember not to do it again!

Sewing Lesson #1:
DON’T SEW WHEN YOU’RE TIRED! You WILL make stupid mistakes, causing you to befriend your seam ripper. You’d think I would have learned this lesson well over the years. Apparently, I’m either quite dense or in need of a refresher coarse.

Sewing Lesson #2:
DOUBLE CHECK YOUR PROJECT BEFORE FIXING THE MISTAKES FROM THE NIGHT BEFORE! ‘Nuff said.

On to the inevitable confession….I’m whipping up a basic 3 gore walking skirt for my daughter’s friend before she goes home to Germany. Simple project, right? You’d think so. I’ve made this exact pattern about 10 times. Suffice it to say, sewing on a zipper (which I’ve done a thousand times) doesn’t go well at 2am. I managed to sew it in backwards, with the zipper pull toward the inside of the skirt. Duh. I was at least wise enough to give up and go to bed.

This morning, I ripped the zipper out and put it in correctly. Again, simple. It was beautiful. A perfectly executed installation. And, I used a regular presser foot instead of a zipper foot so I could show her how it’s done. *Sigh* The only problem this time? I didn’t double check my seams from the late night stitchery and managed to put the zipper into the seam at the hem instead of the waist….both times! Double Duh!

So, out comes Mr. Seam Ripper…it really should be permanently attached to my hand.  You’ll be relieved to know (I certainly was) that the zipper went in correctly on the third try.

Annie, get your gun and get me away from the sewing machine!

Posted in 2012, Sewing | 1 Comment

Fabric Rose Tutorials

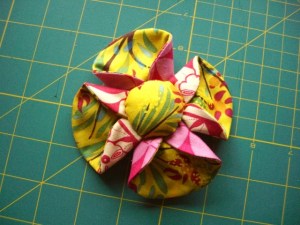
Good morning blog friends! I’m working on yet another dress and needed a fabric rose for the hair accessory. So, a-searching I have gone. There are several tutorials out there in the aether. I liked these best and there’s one for just about any look you want.

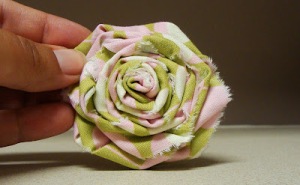
Neat and tidy rose tutorial from Portabellopixie

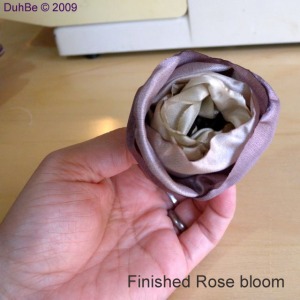
Crinkle edged rose tutorial from DuhBe

Velvet rose tutorial from A Gilded Life

Shabby rose
tutorial from Create & Delegate

Tattered layered rose tutorial from Katie’s Rose Cottage

Stacked petals flower tutorial from Wise Craft

Teacup flower tutorial from Spincushion

Posted in 2012, Tutorials | 3 Comments